Hello all. I am a Nursery Nurse working with special needs children within a main stream school and love it. I have worked as a NN for 34 years and wouldn't change for anything. I have always crafted in some way or another since the age of 7. At present I do a bit of patchwork and quilting, jewellery making and card making.
Thursday, 25 March 2010
Cricut , Design studio and Gypsy Questions
Wednesday, 24 March 2010
Have a go project!! March
You will need:
Piece of thick card or cereal packet - 8cm x 16.5cm
Length of ribbon, peel offs, die cuts, stickers, etc.
1 sheet medium weight 12"x12" paper.
Various backing papers.
Fold 12"x12" paper in half. Now fold one half up to the centre fold, turn over and repeat with other half of paper.
Open out, turn and repeat in opposite direction to form 16 squares.
Make a cut up 3 squares of the middle fold line.
Turn and cut from opposite side on the 2 outer fold lines in the same way. You should have a W shape.
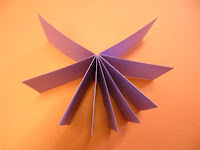
 Starting at the top left, fold in a corcertina manner to make the pages.
 Tape the pages that fold together to make double thickness pages. Follow diagram.
The 2 corner pieces marked with squares of which paper remain single thickness. These attach to the front and back covers of the book.
You should finish with 2 cover sheets and 7 pages.
 Take a pieces of card 8cm x 16.5cm and backing paper cut at 10cm x 18.5cm. Score a line 8cm from both ends to form a spine in the middle.
 Tape backing paper to cover. Mitre the corners, fold over neatly and stick. Attach ribbon across card now to conceal under pages of book or attach to the spine. Attach back and front pages to the inner cover.
Now you have a mini book, decorate the pages using papers of your choice.

Monday, 22 March 2010
MY PHOTOBUCKET CARD SAMPLES


